If you’ve read and watch any PC gaming related information you will at one point or the other heared a lot of keywords like Overclocking headroom, Overclocked at X GHz, running at Y Voltage and so on. All this overclocking thing can get very overwhelming when you first hear about it. Because of this I decided this needs to be addressed and explained so you have a better understanding of what it is and maybe start playing around with it with your PC if you want.
Why is overclocking even a thing
Contents
Overclocking has been part of the PC Gaming community since the early beginnings. People have always wanted to get the most out of their hardware. Others just want to improve their gaming experience and achieve superior FPS from the same hardware. Others just want to see what the limit is where a particular piece of hardware just gives up.
As it is with most things, people want more with less, and achieving a 20 to 100% or more performance gain for some small tweak becomes very tempting.
There are many build guides online showing how you can achieve similar performance from overclocking budget hardware as you would achieve from much more expensive hardware.
If you ever look at the lineup of chips from manufacturers you notice that they have hundreds of different models under different names with very different performance specifications. The fact of the matter is that they don’t really make so many different chips, they make a handful of basic chips and based on what clock speed is achieved during manufacturing and what clock speed is selected for it, they can achieve different results from the same chip. They can optimize the chips to better suite one particular application or another and basically create different chip families for different people and needs. As you can imagine a laptop CPU has completely different working conditions and requirements compared to a server CPU running in an air conditioned server farm.
For example, mobile CPUs have typically been underclocked and downvolted chips based on regular desktop CPUs. This usually results in much lower energy requirements and reduced thermal loads.
Generally all these changes come locked from the factory and you have to take a chip as it is, without being able to change anything with it. That’s why unlocked CPUs are all the rage in overclocking circles. While locked chips generally can’t be overclocked, you still have some knobs you can tweak and get some more out of them.
Because we generally speak of the same chip with different speeds you can see why overclocking is such a widespread practice.
In recent years a lot of the chip speed controlling features have moved inside the CPU-die and we now have CPUs that underclock or overclock depending on current load requirements. Intel’s TurboBoost and AMD’s Turbo Core allow processors to dynamically change the processor frequencies depending on demands. That’s the main reason all of today’s CPUs come with 2 core speeds on the box.
The only limit to how high you can take a chip’s performance is when it starts melting or burning out. Newer processors usually start underclocking(generally called throttling) and turning off cores when they start to overheat so as to not get damaged. Basically as soon as the chip gets too hot, it starts loosing a lot of performance and all the benefits are gone.
What components can be overclocked
Theoretically speaking anything that has a clock speed and voltage can be overclocked. In practice though, there are physical limits to how far you can actually go. Sometimes you end up hitting a bottleneck due to other components that can’t keep up or start overheating and you have to take it down a little. This is the basic process involved in overclocking, you slowly start winding each component up until you hit their limits then you move to the next one.
Processors
This is where it all started. Remember those old PC with the Turbo button? Back then applications were basing their timing on the processor clock speed. As you can imagine, as CPUs evolved and got faster and faster clock speeds, older applications started running too fast to still be usable, so CPUs had to be underclocked to be able to use older software.
Some smart people wondered if you could downclock a CPU, what would happen if you overclocked the CPU. And that’s how it all started.
A processor’s clock speed is basically how many clock cycles a CPU can perform per second. In the past, a CPU’s clock speed was a very good gauge of its performance. In recent times clock speed is only a good measure of performance in the same processor family. So basically a 2.0Ghz Intel Core i3 is 33% slower that a 3.0Ghz Intel Core i3 of the same generation. But its performance isn’t comparable to an i5 because an i5 can perform more/different tasks per cycle.
The maximum speed is determined by overclocking to the point of first instability, then accepting the last stable slower setting. Components are only guaranteed to operate correctly up to their rated values; beyond that different samples may have different overclocking potential. The end-point of a given overclock is determined by parameters such as available CPU multipliers, bus dividers, voltages; the user’s ability to manage thermal loads, cooling techniques; and several other factors of the individual devices themselves (which the user cannot control, just “luck of the draw” if a part is a “good clocker” or not) such as semiconductor clock and thermal tolerances, interaction with other components and the rest of the system.
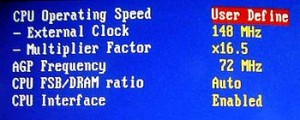
Typical BIOS options
As the quote from wikipedia hints at, the 3 main dials you can tweak to increase processor clock speed and performance are CPU multipliers, base clock speeds and voltages.
On a base level the CPU speed is based on the base clock speed x the CPU multiplier. The voltage is one of those things that even very small increments can make a big difference. The downside is that with more voltage you add more temperature to the system and it plays a big role in the longevity of the processor.
Graphics card

MSI Afterburner settings screen
Most graphics cards are basically small computers on their own. They have GPUs and RAM, both of them have clocks and both can be overclocked. Just like in the case of most CPUs there is headroom to go on a stock graphics card. Some third party graphics cards come with higher clock speeds than what the manufacturer intended, basically coming with some basic overclocking already done. This is usually specified on the box.
The big difference compared to the CPU is that for a graphics card you can do all your tweaking on the fly without needing to restart the computer after each small change.
The main dials you can usually turn on a graphics card are the core clock, shader clock, memory clock and the core voltage. Just like with everything overclocking related you need to take it one step at a time until it doesn’t work anymore and then go back one step. On some graphics cards you don’t get access to changing all these settings and the headroom is also sometimes limited. This is usually the case for mobile graphics cards.
RAM
You’ve probably already noticed that RAM modules come with frequencies and latencies. These are the main things we can use to overclock RAM.
Just like for CPUs, RAM speed is based off of the base clock x memory multiplier. And just like with CPUs you can control the voltage the RAM operates at. The only extra dial that you can tweak in the case of RAM is the CAS latencies.
Because RAM speed is based on the base clock of the system, when you are changing the base clock you are also changing your processor speeds. Because of this, if you have already overclocked your CPU you can go overboard very easily and a fine balance between CPU speed and RAM need to be achieved for stability. All these changes need to be done inside the BIOS and the system need to be restarted after each change.
Displays
Once you’ve overclocked your CPU, graphics card and RAM the only thing left is….your display.
You might be asking what in the name of all that’s holy can you possibly overclock on a display?
You can most of the times get much higher refresh rates and sometimes higher resolutions than what the display is rated at. Higher resolutions were very popular on older CRT screens but due to the way flatscreens work, even if you do manage to get a higher resolution setting you won’t really be able to go finer than what the individual panel pixels allow. So on flatscreens the main dial you can use is getting a higher screen refresh rate.
Higher refresh rates are often desirable for those looking for lower input lag and more fluid motion on screen. Higher refresh rates help a lot if you are trying to display 3D video.
Locked components
I think this needs to be discussed even if just briefly. Manufacturers generally lock their components to ensure that they can offer you the quality that is written on the box. Another reason is marketing. But the main reason is to make sure that you can’t break your computer parts easily or by accident and can enjoy them in the long run. I’m sure that since they started doing this that their warranty claims have dropped off dramatically.
Because most of these parts are interconnected you can generally get away with changing the base clock and getting some improvement out of a locked CPU. In general the possible increase in performance is very limited on locked CPUs.
On graphics cards that don’t give you access to all the settings you can still get some improvement just by altering the setting you do have access to. Even small changes can result in FPS improvements that let you play one game or another that was unplayable before.
Requirements
I was considering going straight into how much headroom you have for overclocking but remembered that that strongly depends on what you are using to power and cool all the components.
You will need to get above average cooling if you are interested in overclocking your components. 9 times out of 10 the limiting factor is the cooling and keeping everything cool. In some cases just upgrading the cooling, without doing any overclocking, can lead to improvements in performance.
For overclocking purposes air cooling can reach its limits quite quickly. Most heavy overclockers prefer the much more efficient water cooling even with its inherent dangers.
You power supply or PSU needs to be of good quality and have enough power. If your system has a low quality power supply that can’t maintain stable voltages towards your components, how can you expect to be play around with component voltages and get satisfying results.
The PSU also needs to be large enough to be able to support the increased power draw the overclocked components cause.
All that power needs to be transported somehow, so obviously you need high quality cables and connectors everywhere. You are running higher voltages and higher power draws that most of those cables have been rated for.
I think this is obvious but you need a motherboard with overclocking options. Most motherboard do tend to have basic base clock settings. More gaming oriented motherboard on the other hand tend to allow much finer settings and generally have an external button for BIOS reset when you have reached the limits and need to go back.
The components you are trying to overclock need to be from a reputable company that takes quality control seriously. You really don’t want a condenser going bad on your graphics card while overclocking.
Headroom
When we talk about headroom we usually mean how much you can actually go above what that particular part has been rated at. In some cases it’s a lot, in others not very much.
Because most CPUs are based on the same architecture, made in the same factories and with the same processes you tend to get quite a lot of headroom. Due to the way CPUs are made, not every CPU is made equal and based on testing manufacturers can determine what sort of badge they can safely stick to a particular CPU. This is also one of the reasons most CPUs are locked from the factory. The manufacturer needs to maintain a certain level of quality.
On unlocked CPUs on the other head, you start off with a CPU chip that is of higher quality and does allow you control over what speed it’s running at. With unlocked chips the limits are given by how well you can cool them and how fast the silica they’re made of can change states from 0 to 1 and back again. Generally speaking a 20 to 80% increase in performance can be extracted from the same chip with the right cooling in place.
If any of you are old enough to remember, tom’s hardware managed to get a 3Ghz Pentium 4 processor to 5.25GHz back in 2003 by cooling it with liquid nitrogen. That was an amazing feat back then, setting the record for overclocking back then. You can read about it here:
http://www.tomshardware.com/reviews/5-ghz-project,731.html
In more recent times the current record is at 7.2GHz from a 3.5Ghz Core i7.
Most people can safely get an extra 20% performance without going to too much trouble.
Risks involved
As with every electronics component you change its working parameters, you are eventually going to hit some problems.
The obvious risks involved are actually frying components, causing fires, melted wires, and electrocution.
Other risk are related to the overall stability of the system. This is where working on the limits of your components come into play. Because they are no longer working optimal, even if everything seems to run smoothly, you are still very likely to get errors with your software. RAM addresses can get corrupted, generated 3D graphics can get aberrations, get pixelated or generally cause display errors. If you end up seeing any of these, then that’s a clear sign you need to step back a notch.
Another risk is drastically lowering the life of the components. As they are running outside of their design parameters they can degrade much faster than normal.
This is another one of those obvious ones, but you will void your warranty if you do any overclocking to components.
How overclocking is usually done
Disclaimer:
This is intended to be a general outline of the way someone would go about overclocking PC components and not a step by step guide. I am not responsible for the results someone might get and the damage they might cause to their property or themselves. If you do any of this you are doing it at your own risk. Please don’t take my advice as fact, there are a lot of variables at play here I can’t foresee.
That needed to be said because I don’t want to be held responsible for someone burning their house down. So let’s get into it shall we:
Cooling
Cooling of all the components is a very good starting point and an ongoing process throughout the overclocking process. As mentioned above, sometimes just by installing adequate cooling you can achieve superior results even before changing any values.
It is good practice to oversize cooling when you first build a PC. If you didn’t do this from the start you can usually find plenty of cooling solutions out there. Read my cooling guide for more details on this topic here.

An example of an all in one water cooler from Corsair
As you start cranking everything up, you will very quickly notice if your cooling isn’t good enough. Once you hit this point you generally need to stop at a stable level and improve your cooling before you can move any further with overclocking.
Some components that aren’t directly related to the parts you are overclocking can also start to overheat. An example of this is due very high temperature inside the case your chipset or RAM or storage drives start to overheat.
Water cooling has proven itself to be the best solution for heavy overclocking applications because it is very efficient and it transports the heat outside the case without overheating the other components. A well designed cooling loop can handle multiple graphics cards and CPUs simultaneously. If installing a custom cooling loop gets too expensive you can always gate an all in one setup for the individual component.
CPU and RAM
Because the overclocking of CPU and RAM is interconnected I think we need to start here. The things you can change are usually only accessible inside the BIOS and require a reboot after each change. If you go overboard with one of the settings your system won’t start at all and you will need to reset the BIOS to its default settings and start again. Gaming motherboards usually have a BIOS reset button that is easily accessible to make this entire process so much easier.
If you motherboard doesn’t feature a easy to reset function you need to consult the motherboards manual and see how this is done for your particular motherboard. Usually it’s moving one jumper on 3 pins, pressing the power button and then moving the jumper back again.
The basic procedure while overclocking is to always as follows:
- change only one parameter at a time incrementally
- test the new setting out and if everything runs stabil increasing that setting further
- once you hit a limit and the system becomes unstable, doesn’t start or gives a lot of error messages you need to go back to the last setting that worked well
- save the setting and move to the next parameter
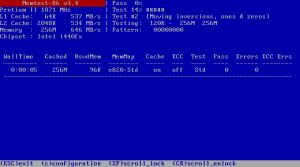
Memtest86 interface
To test your overclock you should be running some form of a stress test program, like Memtest86+ or any other software of your choosing. I like Memtest86+ because it usually comes on most Linux LiveCDs you can download for free.
If you run benchmarks in Windows, you need to keep an eye on temperatures during testing. If the temperature starts rising very quickly and doesn’t settle at an acceptable level, you need to improve the cooling or lower your overclock.
The first thing that can be changed are the multipliers. You can start changing the CPU or RAM multiplier alone without affecting any of the other components. Slowly ramp it up, run a test, and repeat until it doesn’t work anymore. Once you have found this limit you can move on to the bus speed.
On locked CPUs you can’t change the multiplier settings, but you still can get some improvement by changing the bus speed. The bus speed is one of those things that can’t be changed very much. Depending on CPU and RAM combination sometimes just a 2-3 MHz change can lead to instability. Other times you can get away with a 30MHz increase. Bare in mind that the bus speed also influences the chipset and it can lead to overheating of the chipset and decreased performance and stability of the entire system.
The final dial to change is voltages. Again, just like in the case of the bus speed, even very small changes can lead to instability and this needs to be takes very slowly. The main issue with voltage changes is that they lead to much higher temperatures on the components. Depending on component type going above certain voltages can actually damage the chip.
In the case of RAM you can also change the CAS latency. The latencies usually play a role under high load and don’t really make a big difference in gaming. As with all the settings up to this point, take these changes slowly until you achieve a stable setup.
It’s worth pointing out that because not all CPUs are made equal, the end result varies from system to system. Rarely can 2 identical system achieve the same level of overclock.
Graphics cards
Just like in the case of CPU overclocking, your graphics card needs to have very good cooling. Stock cooling setups tend to be design to withstand the standard tune of the card. Once you start overclocking these setups begin to become undersized. You can try overclocking with the stock cooler and see how high you can go, but you can usually go a lot higher by installing a water cooling block onto your graphics card.
To overclock your graphics card you need software that allows you to change your GPU clock speeds and voltages. There are many programs available, but the easiest one to use is MSIs Afterburner. It can overclock almost all graphics cards and it also comes with built in monitoring for temperature and load.

Adding a custom resolution – Intel drivers
Because you are changing settings on graphics cards on the fly, if you go slow enough you can usually see when you are getting close to the limits of your graphics card. The process for overclocking is the same one as up to this point. You change a setting and test the it by running a benchmark to look for any display errors or crashes.
Display
Display overclocking is generally quite simple to do. It follows the same procedure as before, you slowly increase the refresh rate until you get one that works. This is can usually be done straight from the display drivers by adding a custom resolution.
In the case of displays, the type and quality of connection cable can influence what results you get. How high you can go also strongly depends on the display itself and what the internal electronics allow.
Conclusion
Overclocking of PC hardware has been part of the high performance PC culture for many years now. It has generally been limited to advanced gaming PC building discussions.
Most of the electronics inside a PC can usually be safely pushed passed their specified performance to achieve superior results.
Most people can usually do some level of overclocking on their PCs. Some of them can get some really good improvements from their hardware, others not so much if any.
The main cause for concern when undertaking overclocking should always be cooling and stability. If your cooling is powerful enough then you’re only become limited by how stable everything runs. You can usually fiddle around with the tunes of individual components and sometimes achieve better results than with all of them maxed out.
